


Introduction
This guide will show the step of installing the Helix Race crankset onto a bicycle once the steps of installing the bottom bracket and chainring have already been completed.
Parts
-
-
The guide highlights the crankset install process. Prior to installing the crank, you will need to install the bottom bracket in the frame and the chainring on the crank. You can find those guides here: Chainring install and BB Manual
-
Always prep by laying out the parts and tools you need on the workbench for a clean install. For this job, we will need the crankset, some grease, an 8mm hex wrench and a torque wrench capable of reaching 40-45Nm along with an 8mm hex bit for the torque wrench.
-
Add a light coating of grease to the following locations: Each of the 2 silver bearing interface locations on the spindle, the threads inside the spindle, each of the inner bearing races on the bottom bracket.
-
-
-
Fully loosen the APS adjuster so that the inner preload ring if fully backed into the outer ring. Ensure the APS is fully seated into it's position on the arm.
-
If the APS no fully recessed or not seating correctly on the arm, this can result in damage to the APS adjuster or system binding once the crank bolt is torqued to spec.
-
Slide the non-drive arm/spindle assembly into your BB already installed in the frame. (Shown here with BSA BB on a crank stand).
-
New line.Using the long end of an 8mm hex, tighten the crankbolt clockwise while gently pushing on the arm. This will begin to draw the interface together.
-
-
-
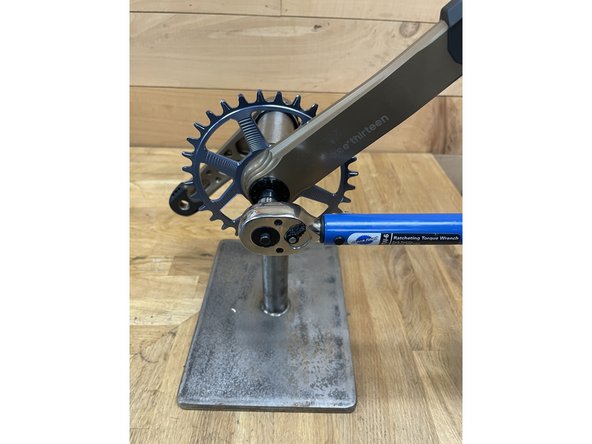
Using a torque wrench and 8mm hex bit, tighten the crankbolt on the driveside arm to 40-45Nm.
-
Correct torque spec is critical for problem free function. Always use a torque wrench to confirm correct tightening spec.
-
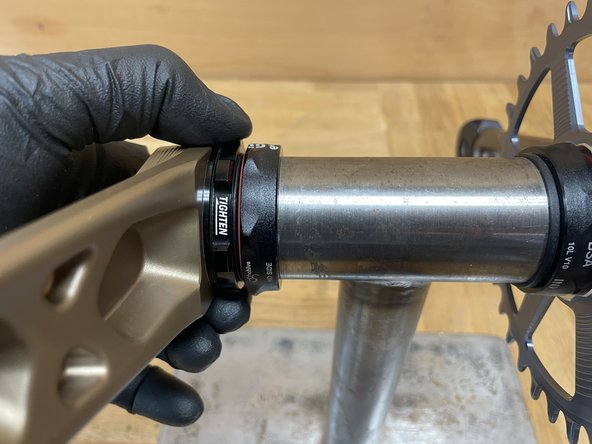
Turn the APS adjuster in the direction of the tighten arrow shown on the APS until all side-to-side free-play has been taken up.
-
The APS should only be hand tight. Never use a wrench or tool to tighten the APS. The APS is held in place with a detent spring on the back of the unit.
-
Press on both sides of the crank attempting to move it side-to-side. There should be no play when the APS is correctly tightened.
-
Once pedals are installed, the crank is now ready to ride! Pedal torque spec is also extremely critical. Pedals should be torqued to 31-34Nm. Failure to do so, could strip out the crank threads and ruin the crank.
-


Thanks for reading, now get out there and ride!
Thanks for reading, now get out there and ride!